April 11, 2013
OK, now the quilt is done and I'm working on flowers. As I'm driving home from Florida and looking at all the spring bloom, that seems appropriate! I got some fabric ready so that I could work on them when I'm not driving.
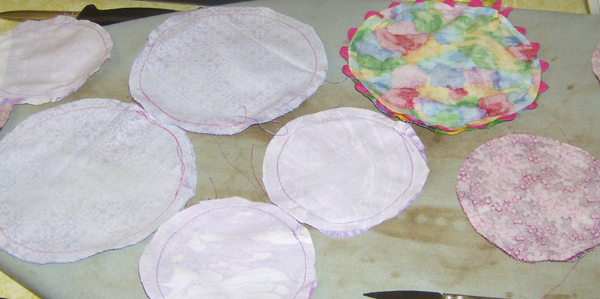
The first kind of flower I prepared for is just circles of fabric, sewn right sides together then cut in half. You need 6 circles the same size to make 3 sewn pieces. I only make a 5 petal flower so I have an extra half circle left over (maybe for a multi-coloured flower!).
And, as you can see from the photo, I decided to try sewing a length of ricrac into one set.
Once you cut them in half, use a heavy thread to make a running stitch along the raw edge of the half-circle. When you reach the edge, keep adding the next half circle until you have 5 of them on a string. Pull up until the 'petal' sit nicely together then make a couple of stitches to hold the flower together.
Now, as to size....this is easy - if you want a flower that is 6 inches across, then make your circles 6 inches wide. Then perhaps to make another layer of smaller petals, use circles 3 inches across (or 4). You can keep layering them, or stop at any point and add a yoyo or a lovely button.
I'm going to sew it to a backing circle of felt to hide the raw edges.
Then, of course, there's the issue of adding them to a quilt that will be washed and washed! I bought some pink velcro tape and am planning to try that on the back of some of the flowers. What do you think of that idea?
I'm also thinking of sewing in a buttonhole in the centre of some of flowers and fastening them with a large button so that the flowers may be removed before the quilt is washed.
I'll let you know which system works! But it will take a while before I know for sure.

Here are the components for my other flower. I had long strips of flower fabric left over from my borders (i.e. making lemonade out of lemons). I sewed 2 strips together with a strip of ric rac then press it. My strips were about 44 inches long. I used a couple of small strips of the fabric as well for the centres of my ricracruchedroses - how's that for the name of a flower?
So, if you haven't ruched before, I folded the 7 inch strip in half and then stitched a long running stitch at 45
° angles from one end to the other. The trick is that when you get to the edge, make sure you wrap the thread over the edge and then make the next angle on the other side.
Then, pull on the thread and you'll make a lovely ruched piece of fabric. My photos were blurred, but what I did was sew it together at the bottom so that it made a 'flower bud' for the centre of the flower.
Next I ran a running stitch along the raw edge of the strip of ricrac fabric and pulled it as much as you can see on the left.
Place your little ruched (pronounced 'rooshed') bud at one end then start arranging the rest of the ruffled ric rac around it and keep making small stitches at the back to hold it all together.
Voila - a ricracruchedrose!


Love your ric rac flowers! Now imagine adding mini pompoms to them?
ReplyDeleteNever thought of that! I even think I have some. But first I have to get busy on the ones I saved to do on my sewing machine!
Delete