

I sew, quilt, do machine embroidery and love crafting! For quilting, I love to use Electric Quilt (EQ8) to design and share.
Wednesday, 28 October 2015
Quilt Retreatables
OK, this might be a longish story, so feel free to just look at the photo and leave!! A couple of years ago, the Canadian Quilters Association/Association de la courtepointe canadienne had a Trend-Tex challenge with 5 fat quarters that you could make into a wall hanging or a 'wearable'. It was interesting to see how many different things could be made from the same 5 fat quarters! (My project was handed in late so it doesn't show up in the gallery.)
I decided to make 'Quilt Retreatables'  The hat was a reversible sun hat pattern from April Cobb - I made the large size, but could use one a little bit larger. Really easy to make though. I made the sample one with Riley Blake fabric (this fabric has its own story! My friend, Jackie White had emailed me that Riley Blake had a challenge out to use some of their fabric to make a bag and send in photos. I was in Florida at the time and only found the fabric used in this photo at a place about 45 minutes from where I was staying. I bought the fabric, but never got the tote made - going to Spring training games to watch the Cardinals, visitors, shopping at Bealls, etc...)
My plan for this kit was to make a set of items that I could take to every quilt retreat. I attend an annual one at Red Lodge Resort on beautiful Manitoulin Island (just in case you don't know: the island is in Lake Huron and is the largest island in a fresh water lake). I wanted the tote to hold my 12 1/2" ruler and small cutting mat, so I designed a square one about 13 1/2" wide and deep enough to hold other tools, threads, bobbins, etc. I had to start mine before I could make the kit for the Trend-Tex Challenge, but didn't finish it right away. I sewed enough to check out my pattern, then completed the Trend-Tex quilt retreatables in time to go to the St. Catharines CQA/ACC quilt conference. It raised $50 in the silent auction.
Last winter I finished my own tote and added a camera bag and a tablet bag to my kit and have taken it away to a quilt retreat and my annual sewing vacation at Boyne, Michigan. I love it and may make some coordinating pieces to take with it - let's see, I could probably use a sewing machine cover, needle case, thread catcher, .... so many other necessities at a quilt retreat!! Maybe even some coasters for my wine glass in the evenings on the deck!

Sunday, 27 September 2015

Sunday, 12 October 2014
Quilt memes 1
I'm going to try to put together some quilt memes for quilters who are teeny bit older!


Sunday, 29 June 2014
Postcard Exchange June 2014
 I completed my first postcard exchange! I received a very creative postcard from Brenda Suderman from Winnipeg - isn't it a great way to celebrate Canada Day? Brenda's blog is scrapsandstrings.blogspot.ca
We did the exchange after Brandy Lynn (explorefibre.ca) sponsored one on her podcast 'Canadian Quilt Talk'
I hope my partner has received mine! I'll show it after I hear that she has it!
Monday, 29 April 2013
Jackie's 3 dimensional fabric flowers
April 29, 2013


Help! The
Bloggosphere ate my post! I wrote a
lovely post this morning and it disappeared!
So...here we go again.
Monday Matters –
because Spring arrived on the weekend and so I just had to work outside! I was thrilled that I had 4 crocuses
blooming, but by now I’m up to about 16.
How wonderful to go out to the brown garden and see orangey- yellow
crocuses with a few purple ones spaced around.
That means that I no longer have to make fabric daffodils and
crocuses. The crocuses are up and the
daffodils are only a couple of weeks away.
So that's why I'm at 'Monday Matters' instead of 'Sew Done Saturday'!
Back to my project
of making 3D flowers for my garden quilt.
Using the method Jackie taught in her tutorial, I made the flowers you
can see here.
She made hers for a lovely
bouquet in a vase. Since mine are going
on a bed quilt, I made buttonholes in them so that they can come off when the
quilt is laundered.
Tuesday, 23 April 2013
Fabric crocus
April 23, 2013
 I have always respected bloggers and was amazed at their generosity in sharing what they do with strangers! So now I'm trying to keep one and 'consistently blogging' is a real challenge. I've been making a spring wallhanging and really wanted to make some spring flowers for it - specifically daffodils and crocuses (croci?) because that's what we're missing in my neck of the woods! See where my daffodils and crocuses are sleeping?
So...following ideas I have seen on other blogs, I began trying to do this piece last 'Whip it up Wednesday'. I found a great 3D daffodil developed by Staci http://craftystaci.com/2012/03/14/fabric-daffodils3-ways/ Her directions were excellent and I made a great daffodil (except that I cut my squares out the wrong size - but Staci can only do so much, right? She can't ensure that I read properly!) You'll see mine on the wallhanging later. But I couldn't finish it on Wednesday, because the only directions for a crocus on the Internet were for a crocheted one.
 After looking at photos of a crocus, I figured that I needed 3 petals on the outside of the flower, 3 on the inside and a stamen or 2 right in the middle.
You can see on the left my design (about 3 1/2" high) with a narrow section in the middle. I actually cut out all 6 layers at once, after pairing my pieces right sides together. That way it was easier to sew around the edge of each pair (the light purples ones). Then I pinked the edges (you could also clip the curves) and cut them in half (the yellow ones) and turned them right side out (the dark purple ones).

 Next I ran a gathering stitch near the raw edge of 3 of the units, gathered them and knotted them together like you can see below with one yellow section ready. It was 'fiddly' and I realized that I needed some stamens for the middle.
I had read Pauline Ineson's article in the American Quilter 2013, so I returned to that for her explanation about how to make stamens.
I won't bore you with the details because you can read it for yourself or check her website and buy her book at http://www.paulineineson.co.uk/page3.htm but very briefly:


Going back to the petals, I put the stamens inside the first set of petals, then, after gathering the second set of petals and put them outside the first set. A few stitches at the bottom held all the sections together.
My last problem was how to show the crocus tapering at the bottom. I used the paper half circle to the left and cut it out so the straight edge was on the fold of the fabric. I sewed around the curve then cut a slit on the back side and turned it right side out.
I used a bamboo stick to help roll it on the bottom of the crocus and then sewed a few stitches to hold it on. I'm quite sure that the bottom section could be improved, but at least I've contributed a 3-d flower to the 'blogosphere'. Thanks to Staci I didn't have to figure out how to do a daffodil! Pauline Ineson, in her article, has another method to make daffodils.
I mentioned that I started this on 'Whip it Up Wednesday'. Then I aimed for 'Tutorial Thursday', then 'Finish it Friday'. I was sure I could finish on 'Sew Done Saturday', but after 'Sew thankful Sunday' passed I had to go to a quilting bee on Monday. So here I am on my 'Tutorial Tuesday' - something to aim for consistently, I guess.
So...following ideas I have seen on other blogs, I began trying to do this piece last 'Whip it up Wednesday'. I found a great 3D daffodil developed by Staci http://craftystaci.com/2012/03/14/fabric-daffodils3-ways/ Her directions were excellent and I made a great daffodil (except that I cut my squares out the wrong size - but Staci can only do so much, right? She can't ensure that I read properly!) You'll see mine on the wallhanging later. But I couldn't finish it on Wednesday, because the only directions for a crocus on the Internet were for a crocheted one.
You can see on the left my design (about 3 1/2" high) with a narrow section in the middle. I actually cut out all 6 layers at once, after pairing my pieces right sides together. That way it was easier to sew around the edge of each pair (the light purples ones). Then I pinked the edges (you could also clip the curves) and cut them in half (the yellow ones) and turned them right side out (the dark purple ones).
Next I ran a gathering stitch near the raw edge of 3 of the units, gathered them and knotted them together like you can see below with one yellow section ready. It was 'fiddly' and I realized that I needed some stamens for the middle.I had read Pauline Ineson's article in the American Quilter 2013, so I returned to that for her explanation about how to make stamens.
I won't bore you with the details because you can read it for yourself or check her website and buy her book at http://www.paulineineson.co.uk/page3.htm but very briefly:
- take 28 inches of 6-strand embroidery thread, fold it in half and tie a knot
- rest the knot under a bobbin on the bobbin-winding 'thingee'
- in the image to the right, I'm holding the thread tightly while running the machine slowly
- then I carefully lifted up the bobbin and held the two ends and the middle and watched the threads wind themselves together
- with a knot at both ends, I could fold it in half and put 2 stamens in the middle of each of my crocuses

Going back to the petals, I put the stamens inside the first set of petals, then, after gathering the second set of petals and put them outside the first set. A few stitches at the bottom held all the sections together.
My last problem was how to show the crocus tapering at the bottom. I used the paper half circle to the left and cut it out so the straight edge was on the fold of the fabric. I sewed around the curve then cut a slit on the back side and turned it right side out.
I used a bamboo stick to help roll it on the bottom of the crocus and then sewed a few stitches to hold it on. I'm quite sure that the bottom section could be improved, but at least I've contributed a 3-d flower to the 'blogosphere'. Thanks to Staci I didn't have to figure out how to do a daffodil! Pauline Ineson, in her article, has another method to make daffodils.
I mentioned that I started this on 'Whip it Up Wednesday'. Then I aimed for 'Tutorial Thursday', then 'Finish it Friday'. I was sure I could finish on 'Sew Done Saturday', but after 'Sew thankful Sunday' passed I had to go to a quilting bee on Monday. So here I am on my 'Tutorial Tuesday' - something to aim for consistently, I guess.
Thursday, 11 April 2013
Flowers, flowers and flowers
April 11, 2013
OK, now the quilt is done and I'm working on flowers. As I'm driving home from Florida and looking at all the spring bloom, that seems appropriate! I got some fabric ready so that I could work on them when I'm not driving.
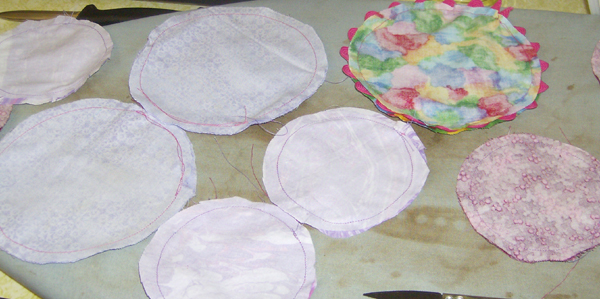 The first kind of flower I prepared for is just circles of fabric, sewn right sides together then cut in half. You need 6 circles the same size to make 3 sewn pieces. I only make a 5 petal flower so I have an extra half circle left over (maybe for a multi-coloured flower!).
And, as you can see from the photo, I decided to try sewing a length of ricrac into one set.
Once you cut them in half, use a heavy thread to make a running stitch along the raw edge of the half-circle. When you reach the edge, keep adding the next half circle until you have 5 of them on a string. Pull up until the 'petal' sit nicely together then make a couple of stitches to hold the flower together.
 Now, as to size....this is easy - if you want a flower that is 6 inches across, then make your circles 6 inches wide. Then perhaps to make another layer of smaller petals, use circles 3 inches across (or 4). You can keep layering them, or stop at any point and add a yoyo or a lovely button.
I'm going to sew it to a backing circle of felt to hide the raw edges.
Then, of course, there's the issue of adding them to a quilt that will be washed and washed! I bought some pink velcro tape and am planning to try that on the back of some of the flowers. What do you think of that idea?
 I'm also thinking of sewing in a buttonhole in the centre of some of flowers and fastening them with a large button so that the flowers may be removed before the quilt is washed.
I'll let you know which system works! But it will take a while before I know for sure.

 Here are the components for my other flower. I had long strips of flower fabric left over from my borders (i.e. making lemonade out of lemons). I sewed 2 strips together with a strip of ric rac then press it. My strips were about 44 inches long. I used a couple of small strips of the fabric as well for the centres of my ricracruchedroses - how's that for the name of a flower?
 So, if you haven't ruched before, I folded the 7 inch strip in half and then stitched a long running stitch at 45° angles from one end to the other. The trick is that when you get to the edge, make sure you wrap the thread over the edge and then make the next angle on the other side.
 Then, pull on the thread and you'll make a lovely ruched piece of fabric. My photos were blurred, but what I did was sew it together at the bottom so that it made a 'flower bud' for the centre of the flower.
Next I ran a running stitch along the raw edge of the strip of ricrac fabric and pulled it as much as you can see on the left.
Place your little ruched (pronounced 'rooshed') bud at one end then start arranging the rest of the ruffled ric rac around it and keep making small stitches at the back to hold it all together.
Voila - a ricracruchedrose!

OK, now the quilt is done and I'm working on flowers. As I'm driving home from Florida and looking at all the spring bloom, that seems appropriate! I got some fabric ready so that I could work on them when I'm not driving.
And, as you can see from the photo, I decided to try sewing a length of ricrac into one set.
Once you cut them in half, use a heavy thread to make a running stitch along the raw edge of the half-circle. When you reach the edge, keep adding the next half circle until you have 5 of them on a string. Pull up until the 'petal' sit nicely together then make a couple of stitches to hold the flower together.
I'm going to sew it to a backing circle of felt to hide the raw edges.
Then, of course, there's the issue of adding them to a quilt that will be washed and washed! I bought some pink velcro tape and am planning to try that on the back of some of the flowers. What do you think of that idea?
I'll let you know which system works! But it will take a while before I know for sure.
Next I ran a running stitch along the raw edge of the strip of ricrac fabric and pulled it as much as you can see on the left.
Place your little ruched (pronounced 'rooshed') bud at one end then start arranging the rest of the ruffled ric rac around it and keep making small stitches at the back to hold it all together.
Voila - a ricracruchedrose!
Subscribe to:
Posts (Atom)